Contents
Having difficulties working or understanding ROS? Or are there too little resources that can be found in the Web? This were the same difficulties I faced when I first began learning ROS. Therefore, I have decided to create a ROS tutorial series based on my learning experiences, as I myself found it difficult to understand or use ROS (especially their fancy or weird naming convention & terms). Hopefully, these tutorial series will be able to enhance or aid your learning experience of ROS. Though I’m still in the process of learning ROS, I will try to keep the information or concepts mentioned as accurate as possible.

About ROS
ROS, known as Robotics Operating System, is a Linux based software framework for operating robots. It is not really an operating system, but it is more of a framework that contains a bunch of libraries, programs & tools. As creating a robotic framework from scratch is really complicated, the purpose of ROS is to create a standardized robotics framework that makes programming a robot much easier. Being open source, many libraries were written by users & instituitions to support the various commonly used drivers or algorithms, which are mainly located in Github. ROS uses TCP/IP for communications.
Who uses ROS?
Anyone who wants to build a robot would usually use ROS, ranging from hobbyists to academic or research institutions. Why would one reinvent a wheel when it is already out there?
How it works
ROS system uses a graph based architecture for communication. A graph consists of two basic elements: nodes (or vertices, usually depicted as circles) and edges (usually depicted as lines connecting nodes). In the case of ROS, the programs used in ROS are represented as nodes, and communication are know as topics. Before running these nodes, one would have to run the ROS Master.
The Coordinator – ROS Master
Let’s imagine the ROS Master as an air traffic controller (ATC). The job of the air traffic controller is to prevent collisions, organize and ensure the smooth flow of air traffic, and provide information and other support for pilots. Just like an air traffic controller, this ROS Master acts as the coordinator and manager of these nodes, allowing the nodes to find & communicate with one another. With that, these nodes just need to ask the ROS Master where the other node is to deliver the message.
Generic Terms VS ROS terms
- Coordinator -> ROS Master
- Programs -> Nodes

The User – Programs (aka “Nodes”) & Messages (aka “Topics”)
The programs of ROS, usually called nodes in ROS, are responsible in interfacing with hardware devices or sensors, and providing the robot logic and algorithm. These nodes will communicate with one another to receive or broadcast the necessary data. Let’s imagine nodes as users in a social media, like Twitter. Assume person A tweets things relevant to life, B tweets on Technology, and C on Food. Suppose B & C follows person A, and A follows C. When Person A post a tweet or a post, B & C, who are following A, will receive the tweets. Likewise for C, when he tweets something new, person A will receive the tweets.
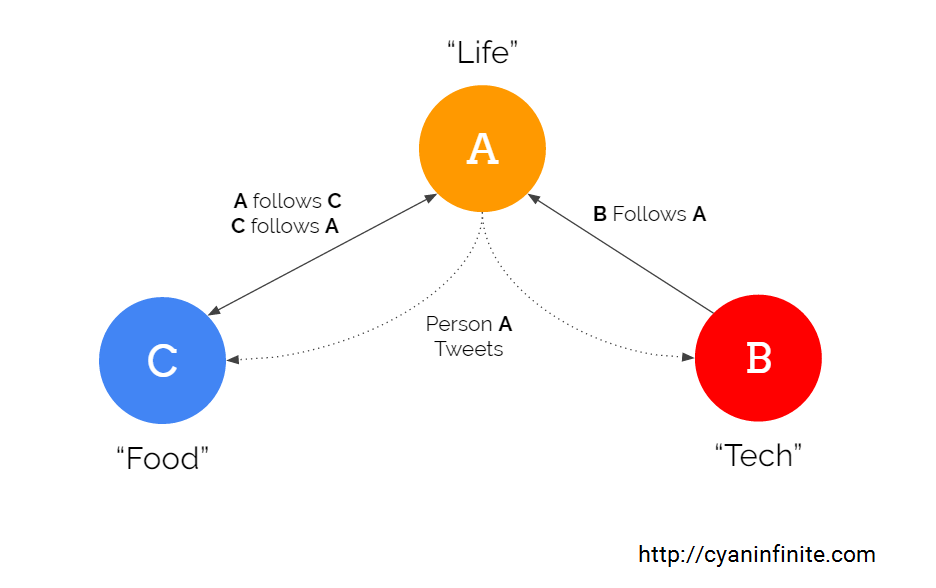
In ROS, these nodes will be able to either follow other nodes or tweet about things the other nodes would want to follow. When one node follows another node, it is know as subscribing, and when one node post a message (called topics), it is known as advertise.
Generic Terms VS ROS terms
- Follow a person to see what they post -> Subscribe
- Post new stuff for people to see -> Advertise
- The stuff I post -> Topics
Requirements
![]()
Though ROS are available in many various systems, we would be using Ubuntu Linux, which is a popular Linux distribution for the ROS tutorial series. Therefore, you need to have Ubuntu in your computer & some background knowledge in using Linux operating system. For this tutorial, we will be using 64bit Ubuntu 14.04 LTS (Trusty Tahr). You can either install Ubuntu stand alone (which is ideal), alongside with your Windows/Mac OS (via Dualboot), or in Virtualbox (not too ideal as the graphic based softwares (Rviz, Gazebo) do not work very well in virtual environments, unless your computer is very, very powerful). Below are a few links to get you started with the installation & basics of Ubuntu/Linux.
Installing Ubuntu:
Standalone:
Windows:
- http://www.pcworld.com/article/2142325/install-ubuntu-and-keep-windows.html
- http://www.psychocats.net/ubuntu/installing
Mac:
Virtual Machine:
Here are some links to learn the basics of Linux/Ubuntu:
- http://www.tecmint.com/free-online-linux-learning-guide-for-beginners/
- https://www.linux.com/learn/linux-101-introduction-sudo
- https://ubuntuforums.org/showthread.php?t=801404
Installing ROS

For this tutorial, we will be using ROS Indigo Igloo, as it has the most stable & supported software.
To install ROS, we will first add the package links into the update source list so as to tell your computer where to get the ROS packages. Open up your terminal (Crtl+Alt+T) and type the following commands:
$ sudo sh -c 'echo "deb http://packages.ros.org/ros/ubuntu $(lsb_release -sc) main" > /etc/apt/sources.list.d/ros-latest.list'
$ sudo apt-key adv --keyserver hkp://ha.pool.sks-keyservers.net --recv-key 0xB01FA116
After that, we will update the package index & programs (if necessary) first.
$ sudo apt-get update
$ sudo apt-get upgrade
We will be installing the Full Desktop ROS, which will include: ROS, rqt, rviz, robot-generic libraries, 2D/3D simulators, navigation and 2D/3D perception.
$ sudo apt-get install ros-indigo-desktop-full
Before you can use ROS, you will need to initialize rosdep. rosdep enables you to easily install system dependencies for source you want to compile and is required to run some core components in ROS.
$ sudo rosdep init
$ rosdep update
To make life easier, we would add this line so that the ROS environment variables are automatically added to your bash session every time a new shell is launched:
$ echo "source /opt/ros/indigo/setup.bash" >> ~/.bashrc
$ source ~/.bashrc
And Viola! You have installed ROS in Ubuntu! In the next tutorial, we will learn how to setup the workspace for ROS, some basic ROS commands and many more!
Extra!
Make use of the tab auto completion in Ubuntu! While typing a command, press the tab key to complete the rest of the command. If there are multiple commands that are similar to the command you are typing, double tap the tab key will list the possible options.