Contents
Stepper motor are used to move in discrete steps, which means you can control the steeper motors with precision. Where do they use stepper motors in? There are many usage of stepper motors, which includes medical scanners, 3D printers, in camera for auto focus, and many more. In this tutorial, you’ll be learning how will you interface a 5V 28BYJ-48 Stepper motor with an Arduino Uno, using a ULN2003 driver.

Features of a stepper motor
What makes a stepper motor different from regular motor? Well, as I have mentioned, stepper motors can move in discrete steps, where each step is a fixed angle increment. This is rather similar to servo motors as the motion of the servo is controlled by telling it how much angle I want it (the servo motor) to move, but the motion of servos are usually constrained from 0 to 180 degrees. Therefore, if you need to rotate continuously while maintaining precision, stepper motor would be our choice. However, stepper motors are a bit harder to control than regular motors & servos.
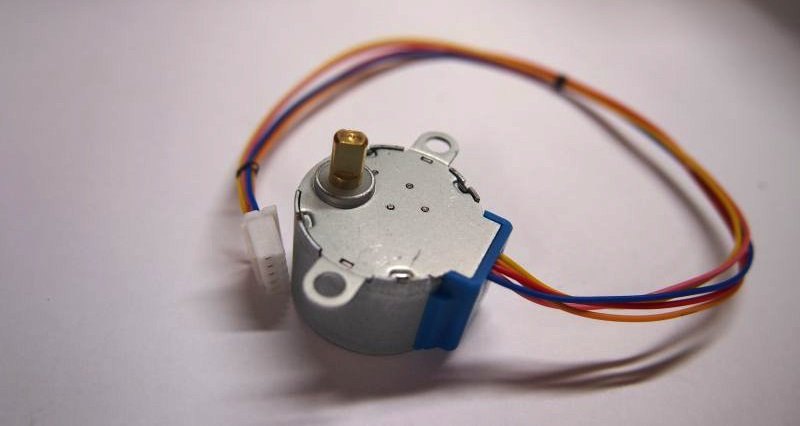
More on 28BYJ-48 Stepper Motor
Here are the specifications of this stepper motor:
- Rated voltage : 5V DC
- Number of Phase: 4
- Speed Variation Ratio: 1/64
- Stride Angle: 5.625°/64
- Frequency: 100Hz
Since the stepper motor has a stride angle of 5.625° and a gear ratio of 1:64, we can determine to total number of steps by multiplying the number of steps in one revolution with it’s gear ratio. In the case of this motor:
Steps in One Revolution: (360°/5.625°) = 64 Steps
Total steps = Steps in One Revolution x Gear Ratio = 64 x 64 =4096 steps
Therefore, we can conclude that this stepper motor has a 4096 Steps .
Parts required
- 28BYJ-48 Unipolar Stepper Motor
- ULN2003 Stepper Driver
- Some jumper wires (~6)
- Arduino Uno
Connections
To interface the stepper motor to the Arduino, we would be using the ULN2003 stepper driver as to amplify the control signal from the Arduino Uno. Here are the pin connections to the stepper driver:
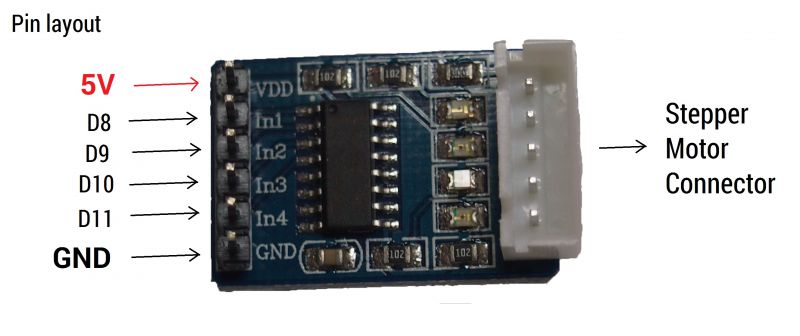
From the left, Input 1 to 4 (In 1,..,In 4) will be connected to Arduino Digital pins 8, 9 ,10, 11 respectively. The VDD will be connected to Arduino’s 5V pin & GND to GND pin. On the right hand side, just attach the stepper motor connector to it. Now this is done, let’s move on to controlling the stepper motor.
Control
How would you control a stepper motor using the Arduino? Step motor converts pulse to angle displacement. So, when the stepper driver receives a certain pulse signal, it will move the step motor to a certain angle. With this, the angle of the stepper moved is determined by the number of the pulse. On the other hand, the speed of the stepper motor is determined by the frequency of the pulse. The following image is the switching sequence of the stepper motor.
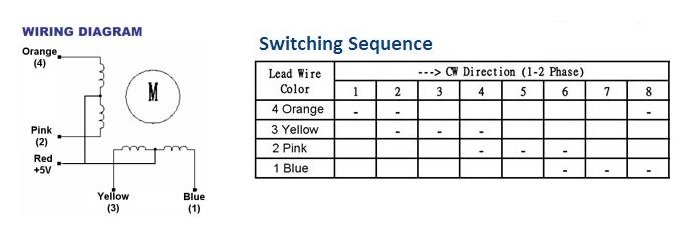
Referring to the table above, we can drive the motor by enabling the pins in an 8-phase order from left to right. The Lead wire colour can be found on the stepper motor.(Clockwise movement):
- Drive IN4 only
- Drive IN4 and IN3
- Drive IN3 only
- Drive IN3 and IN2
- etc.
For anti-clockwise motion, we will simply reverse the sequence.
Coding
Even though the there is a stepper library provided in the Arduino IDE, there will be some problems that you’ll encounter. Therefore, I have decided to use an alternative library instead, which is the AccelStepper library. You can download the library here. Once installed, upload the following code below:
#include <AccelStepper.h>
#define HALFSTEP 8  //Half-step mode (8 step control signal sequence)

// Motor pin definitions
#define mtrPin1  8     // IN1 on the ULN2003 driver 1
#define mtrPin2  9     // IN2 on the ULN2003 driver 1
#define mtrPin3  10     // IN3 on the ULN2003 driver 1
#define mtrPin4  11     // IN4 on the ULN2003 driver 1

AccelStepper stepper1(HALFSTEP, mtrPin1, mtrPin3, mtrPin2, mtrPin4);

void setup() {
  stepper1.setMaxSpeed(1000.0);
  stepper1.setAcceleration(100.0);  //Make the acc quick
  stepper1.setSpeed(300);
  stepper1.moveTo(4096/2);  //Rotate 1 revolution
}

void loop() {

  //Change direction when the stepper reaches the target position
  if (stepper1.distanceToGo() == 0) {
    stepper1.moveTo(-stepper1.currentPosition());  //Reverse motor
  }
  stepper1.run();  //Start
}
What does it does? Well, the code will call the stepper motor to rotate one revolution (which is 4096/2 = 2048 steps as 4096 will result in 2 revolutions) in anti-clockwise direction, and after that it will rotate in clockwise direction.