Contents
Ever wanted a way to get updates on your GitHub repository when someone pushes a commit, does a pull request, raise an issue, etc? With Github Actions, you can do just that with the Telegram Notification Workflow!
Github Actions
Automate your workflow from idea to production
What GitHub actions does is to provide a way or workflow for user to automate certain process when certain actions are triggered, for example performing a check on code vulnerability when a commit is pushed, deploy a web service, etc.
For this tutorial, we’ll be looking at adding the Telegram Custom Message Action to our repository such that a notification would be sent to your bot when some actions are triggered. (Push, Pull request) With that, let’s get started!
Prerequisites
- Github Account
- Telegram account
Before starting, ensure that you have a Github account and a Telegram account, with Telegram installed in either your smartphone or computer.
Telegram
We’ll be creating a telegram bot so that the notification would be sent to us, which could be done so through BotFather. To do so, open the following the following link, which would open your Telegram App.
Creating a bot
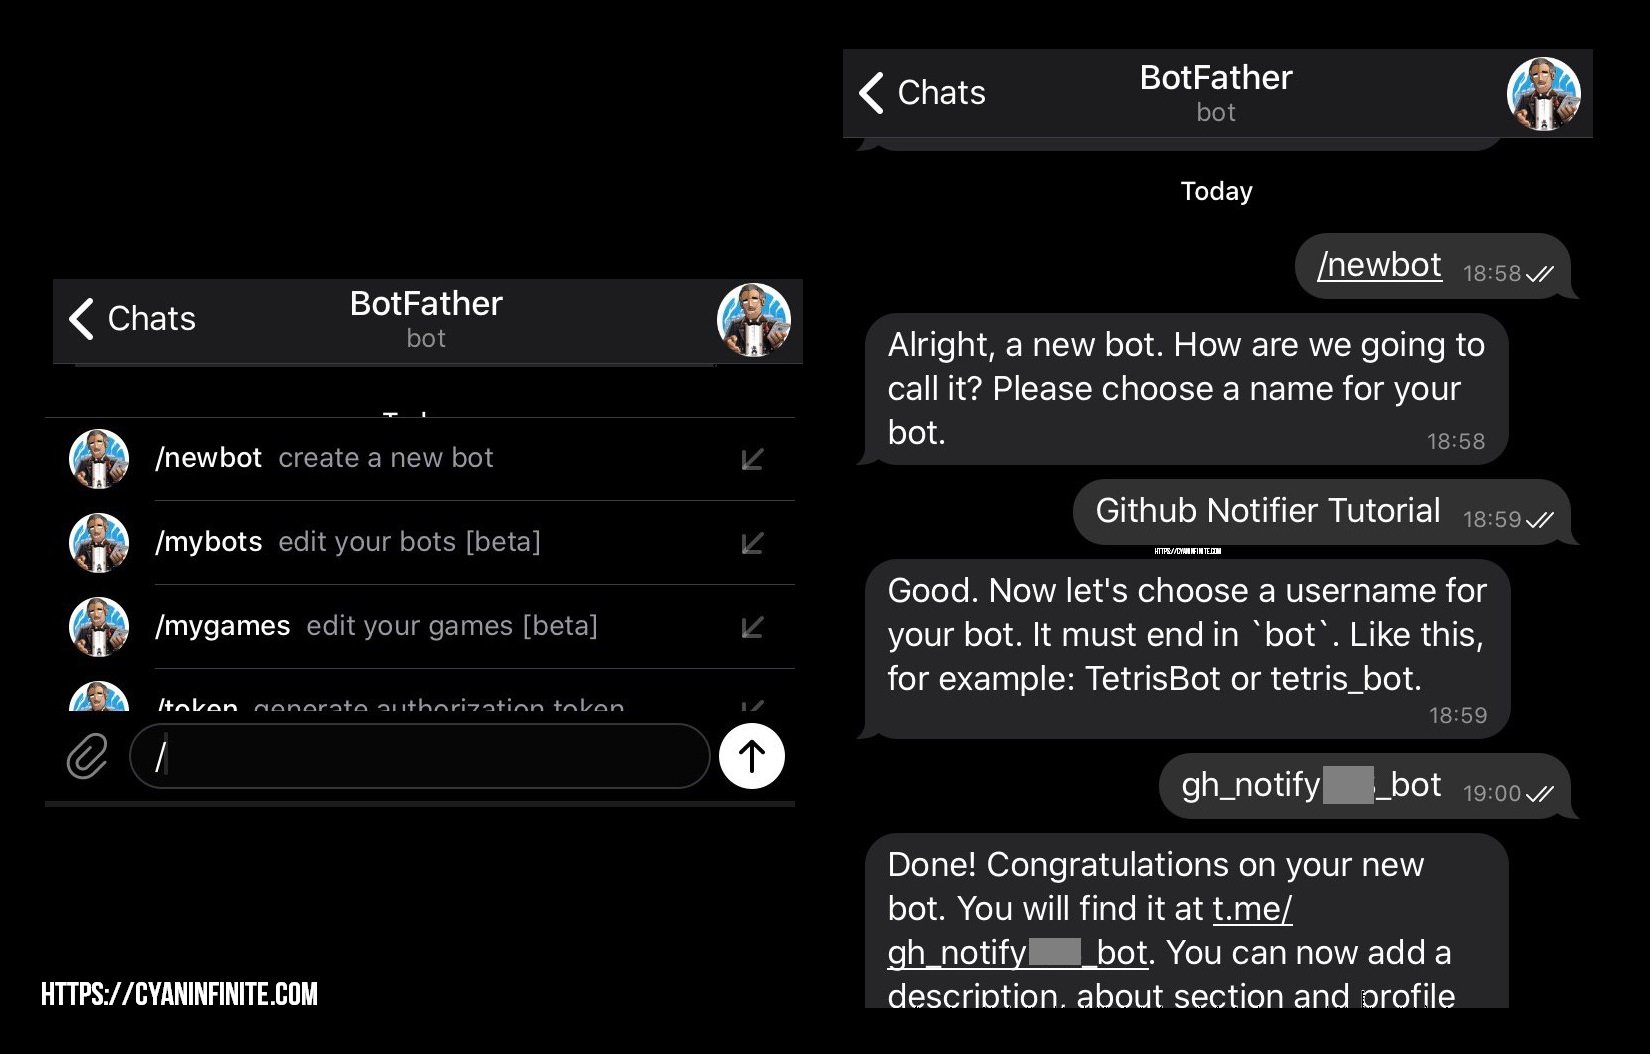
To create a new bot, we would have to "talk" with BotFather. Type in "/newbot" and select the first option. Enter the following details as the bot prompts:
Name: Github Notifier Tutorial
Username: gh_notify[random number]_bot (For example, gh_notify3288_bot)
Note: For the username, enter a name that is not taken, as the username of the bot have to be unique!
Getting the Tokens
Once all the details have been entered, you’ll recieve the confirmation message for your bot along with the details of the token. Copy the token key as we it would be required later on. (It would be in the ##########:xxxxxxxxxxxxxxxxxxxxxxxxxxxxxxxxxxx format, where # are numbers and x are alphanumeric characters)
NEVER share your token with anyone, as it could be used to control your bot!
After that, open the link of your bot in the message and press start. (There should be no response) This is to get the unique chat id, which tells the telegram bot to notify only you.
With the telegram bot created, let’s proceed with the Github part.
Github
Selecting a repo
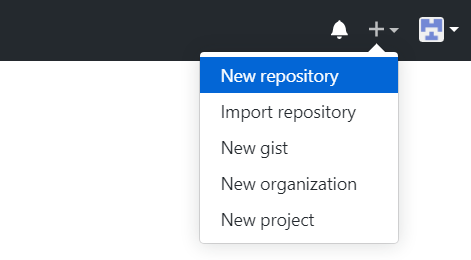
For this tutorial, you could either pick an exisiting repository to implement the actions or create a new repository. For this tutorial, we’ll be creating a new repo. To create a new repo, click on the plus icon beside the profile icon, and then "New repository".
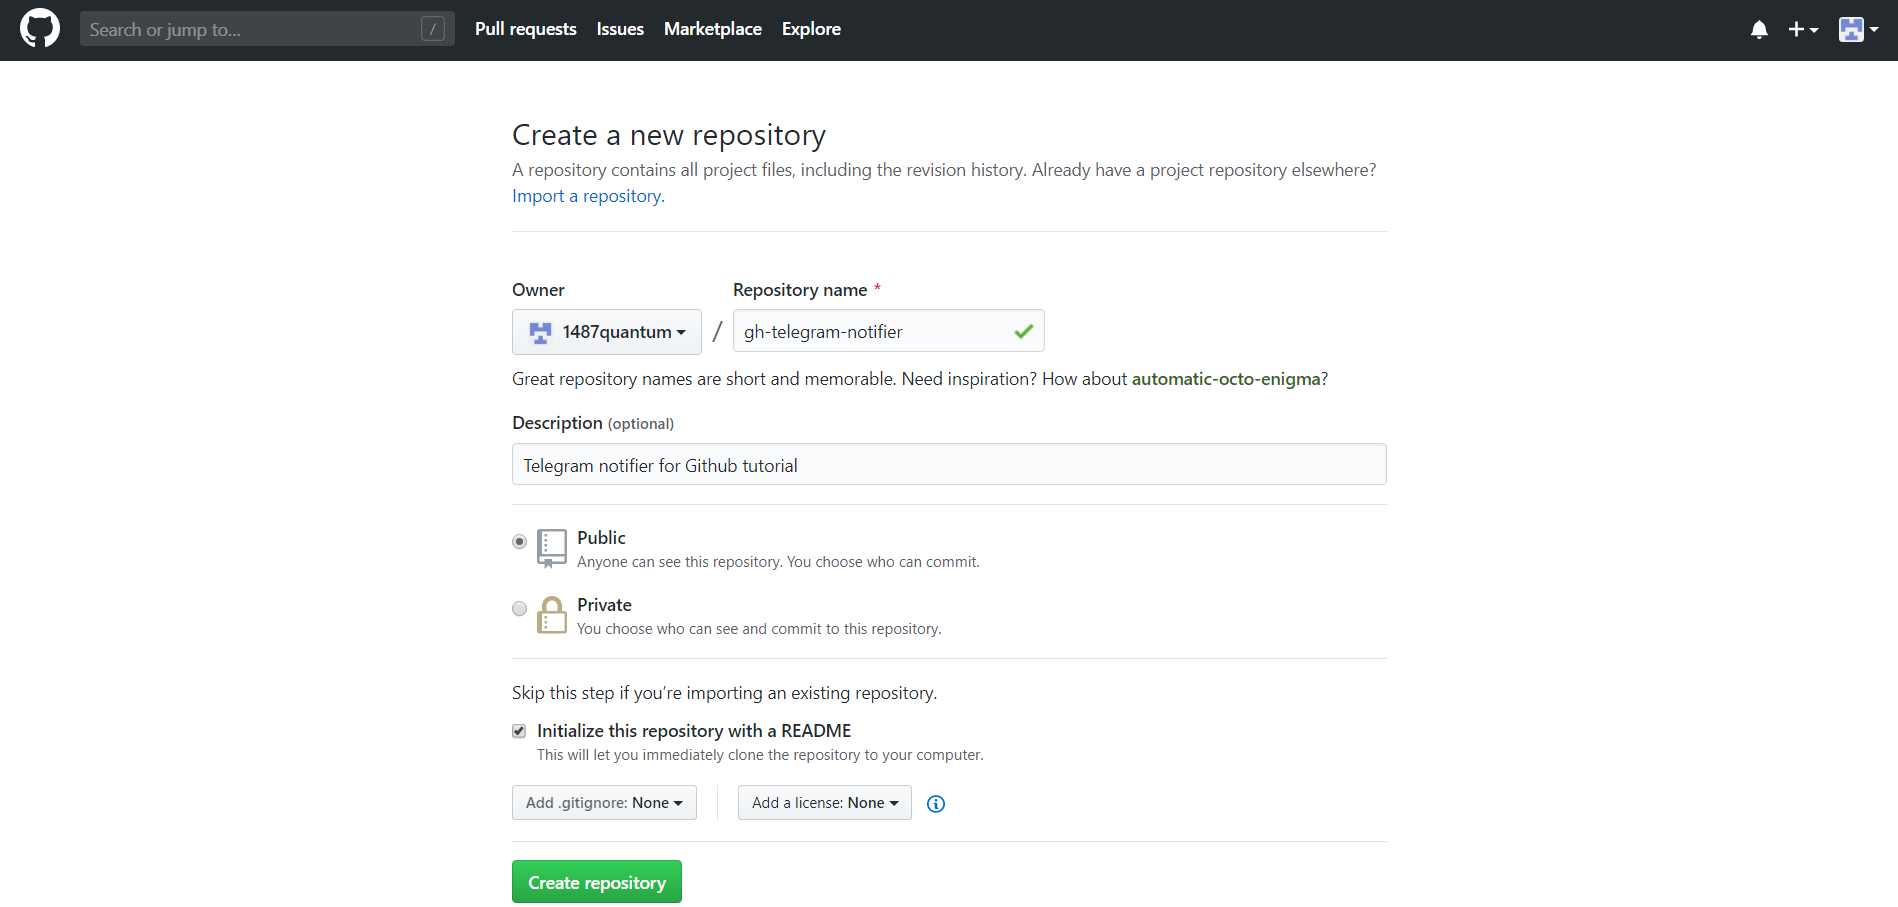
Let’s name the repo as gh-telegram-notifier, check the checkbox "Initialize this repository with a README" (The description is optional) and create the repository. You’ll be redirected to the new repo once the repo has been created.
Secret Variables
We’ll be using the secrets variable to store our Telegram bot token and our chat identifier key (in order to know who to notify when there is a change in the GitHub repo status). Visit the following URL on your web browser:
https://api.telegram.org/bot<TokenID>/getUpdates
replacing <TokenID> with your bot token. This would return a JSON response, and we can get the unique chat id from the "from" entry:
{
"ok":true,
"result":[{
  "update_id":467942493,
  "message":{
    "message_id":1,"from":
{"id":
000000001
,"is_bot":false
...}}}]}
In this example, the unique chat id would be 000000001.
Returning to your repo, click on the "Settings" tab, followed by the "Secrets" menu on the bottom left of the menu. We would be adding the variables here.

Add the variables as follows, replacing the entries accordingly.
TELEGRAM_TO: <ChatToken>
TELEGRAM_TOKEN: <BotToken>
(For example, the TELEGRAM_TO would only consists of numbers (0000000001) & TELEGRAM_TOKEN follows the ##########:xxxxxxxxxxxxxxxxxxxxxxxxxxxxxxxxxxx format.)
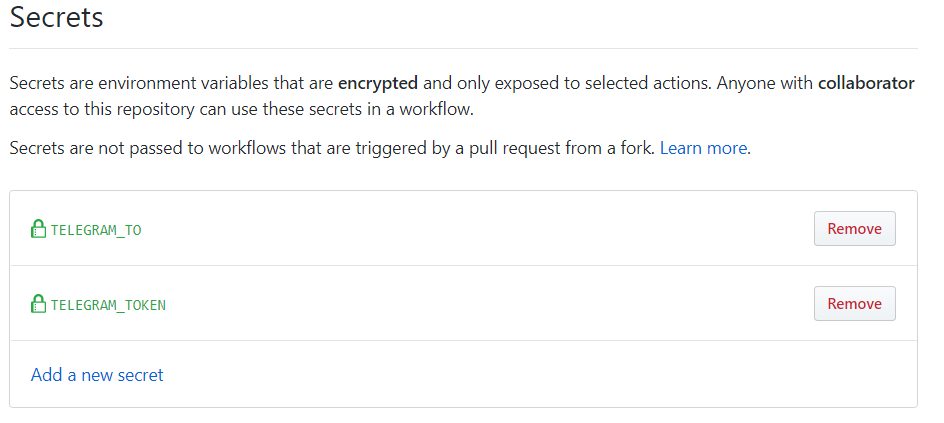
Once the Secrets has been set up, we would move on to create the GitHub Action Workflow.
Setting up the Workflow
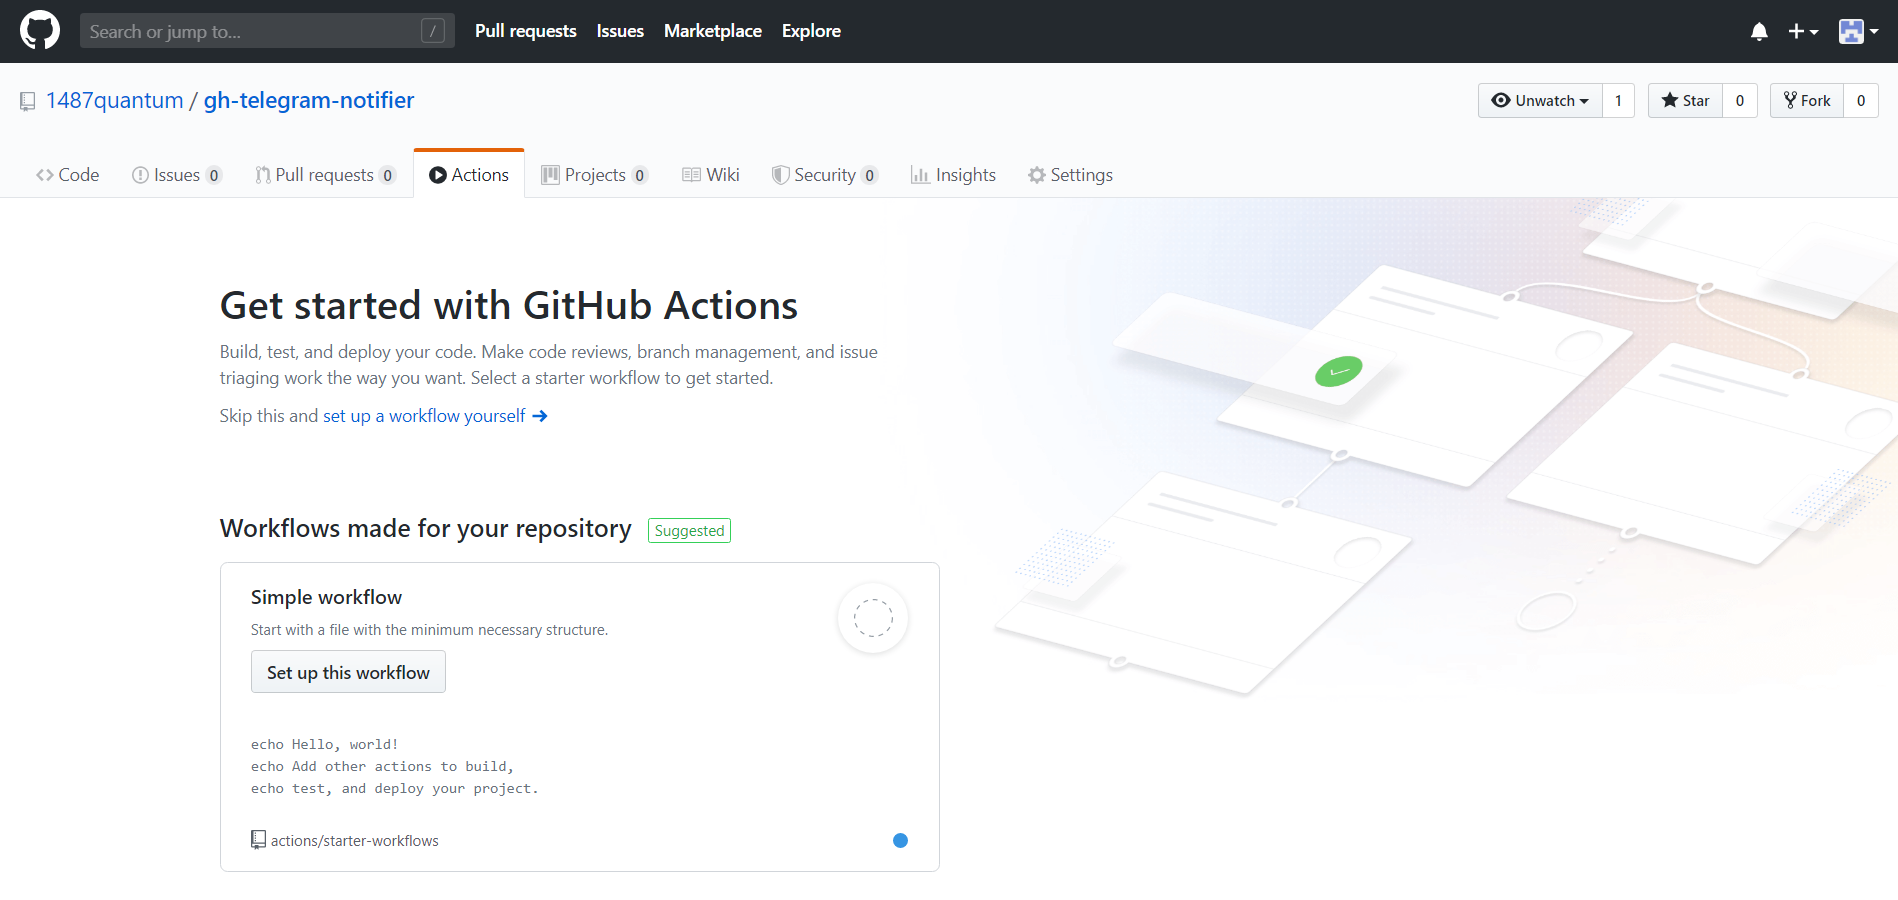
Click on the "Actions" tab below the title of the new repo, and then click on the "set up a workflow yourself" link.
A default template would be initialized by default, and we would want to change the setup accordingly. Update the name from "main.yml" to "tg-notify.yml", and replace the code with the one as shown below. (We’ll be using appleboy/telegram-action in this tutorial.)
name: tg-notify

on: [push, pull_request]

jobs:
  build:
    runs-on: ubuntu-latest
    steps:
    - name: Update status
      uses: appleboy/telegram-action@master
      with:
        to: ${{ secrets.TELEGRAM_TO }}
        token: ${{ secrets.TELEGRAM_TOKEN }}
        message: |  #https://help.github.com/en/actions/reference/contexts-and-expression-syntax-for-github-actions#github-context
          ${{ github.event_name }} commit in ${{ github.repository }} by "${{ github.actor }}". [${{github.sha}}@${{ github.ref }}]
What the following workflow does is that it sends the user a notification via Telegram when the repo have a new push commit or pull request. The message would contain the commit status (either a push or pull request) with the repo name, followed by the username of the person who triggered the workflow. (Along with the commit SHA & the branch/tag reference that triggered the workflow run)
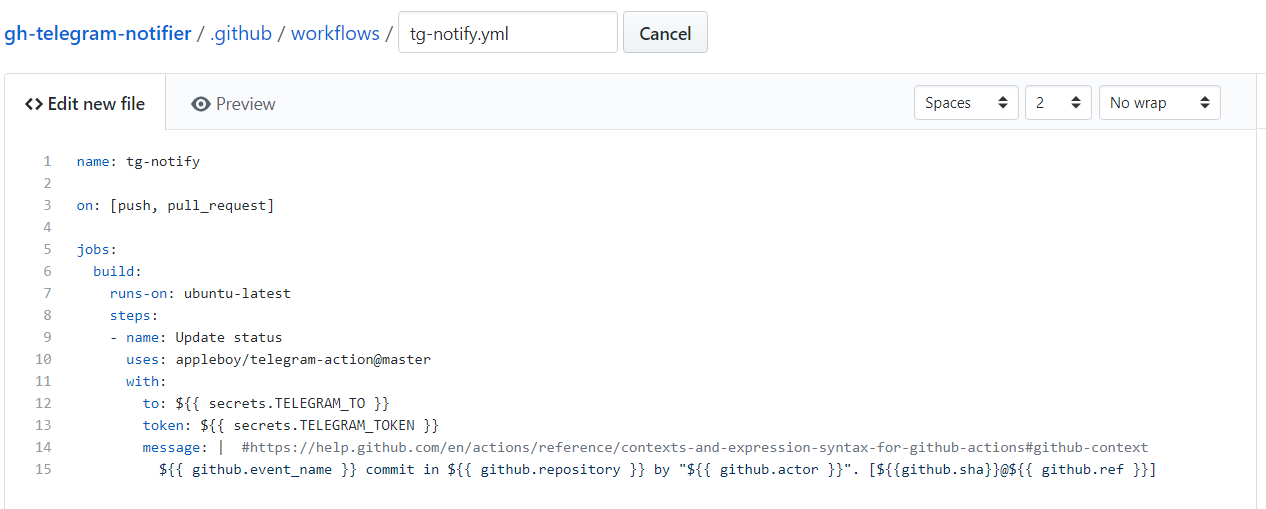
More info on the types of events that can trigger the workflow could be found here.
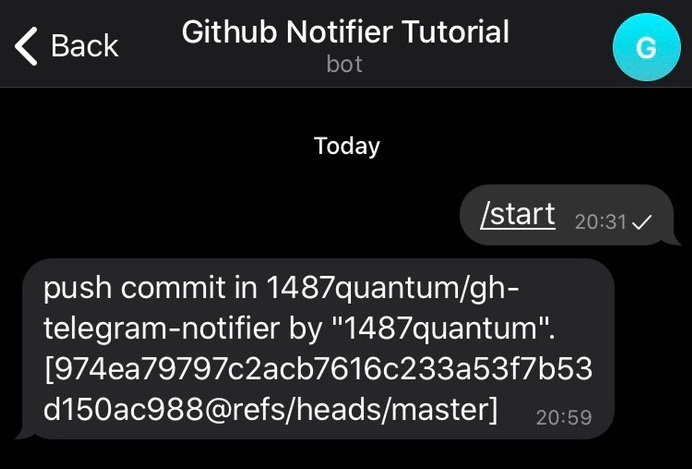
Once done, click on "Start Commit" and select "Commit New File". This would create the Workflow and start the Github Action. After a few seconds, you should recieve a Telegram message from your Telegram Bot as shown below, which means that the Actions are working!
Source code
The example repository could be found here: https://github.com/cyaninfinite/gh-telegram-notifier.
Customizing the message
The message could be customized via the message parameter, and the following variables could be used:
| Github Variable | Description |
|---|---|
| github.event_path | The path to the full event webhook payload on the runner. |
| github.job | Current job ID. |
| github.run_id | A unique number for each run within a repository. (Number does not change if you re-run the workflow run.) |
| github.actor | User that initiated the workflow run, as defined in “on” parameter. |
| github.repository | Name of github username and repository. (username/reponame) |
| github.sha | SHA hash of commit that triggered the workflow. |
| github.ref | Branch or tag ref that triggered the workflow run. |
The variables shown in the table above is non-exhaustive, visit https://help.github.com/en/actions/reference/context-and-expression-syntax-for-github-actions for more available environment variable.
Remember to add the ${{ [varName] }} to evaluate the variable, else it would not be interpreted properly.
References