Contents
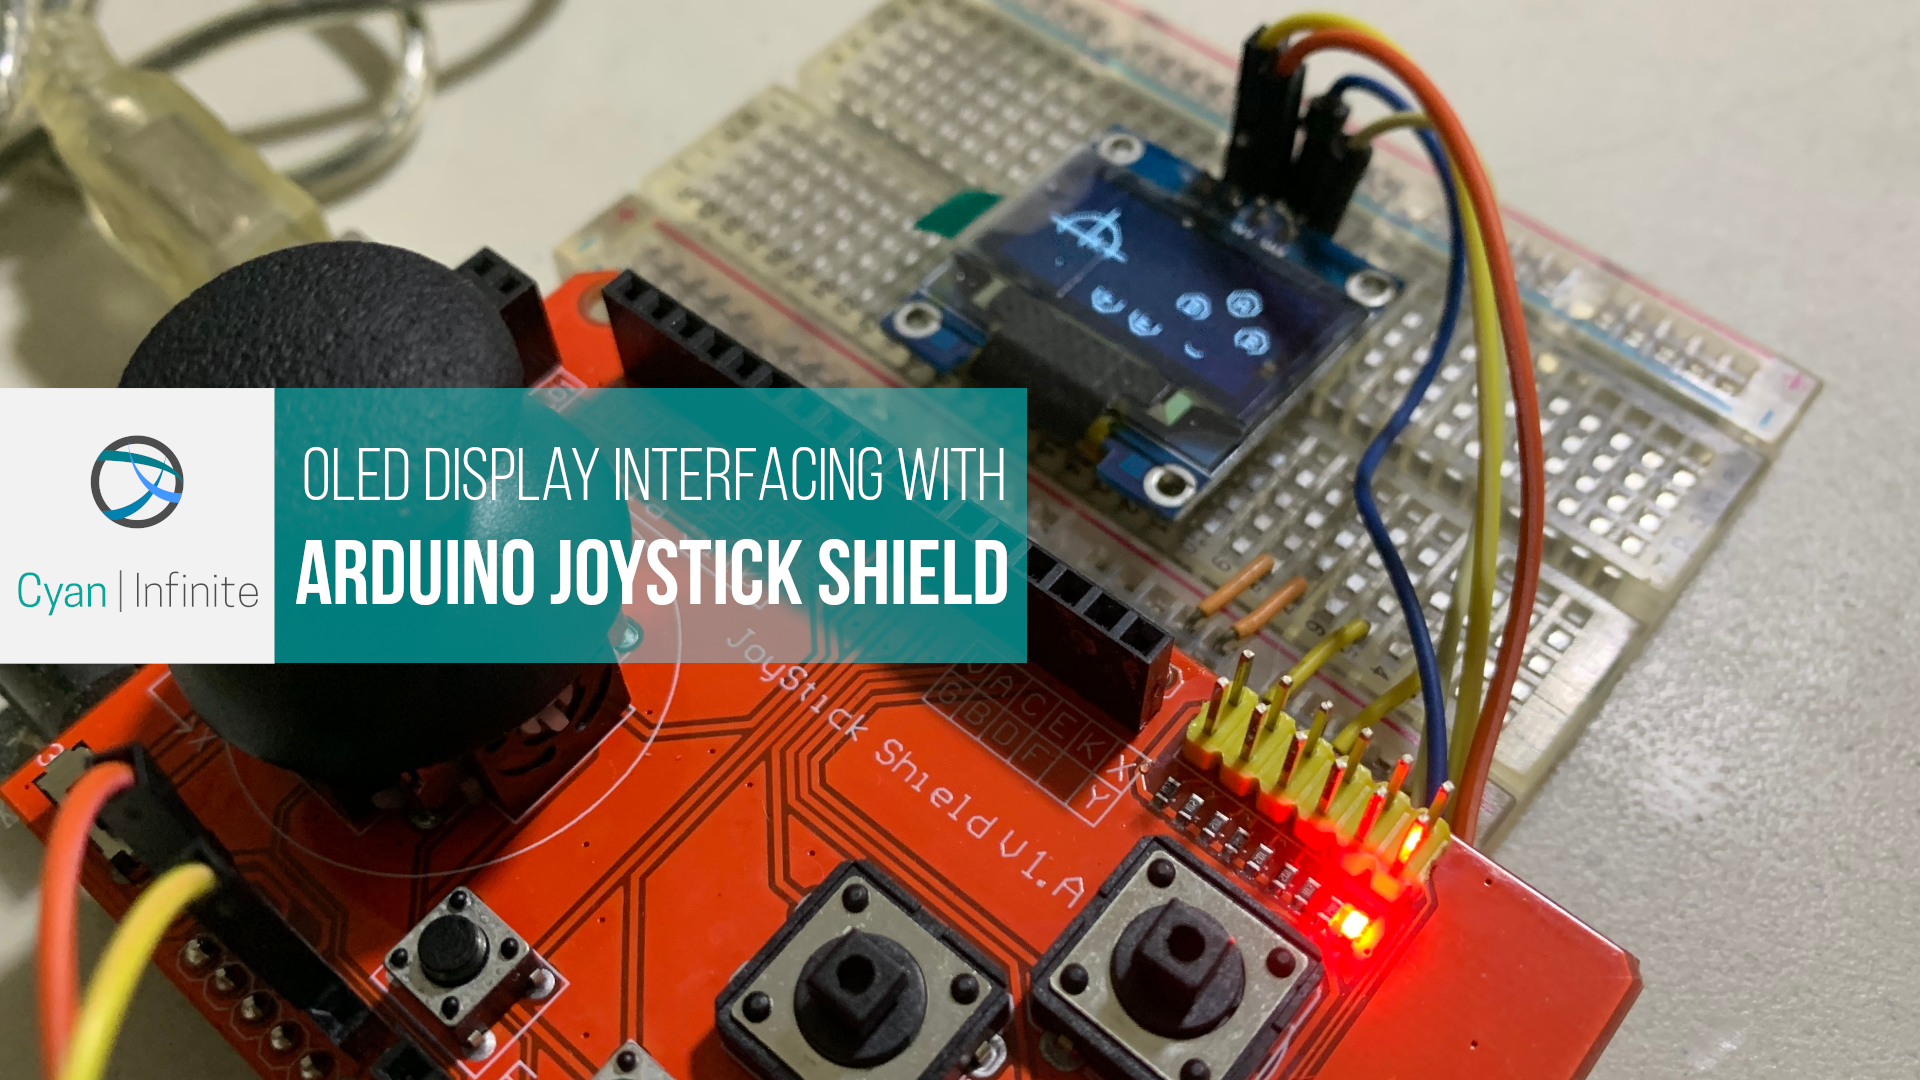
The Arduino Joystick shield could be used as a user interface, be it as a remote control to wireless send commands to control a robot, or as a game controller interface, etc. In this tutorial, we’ll be exploring how to interface the shield with the arduino, and using a 0.96" OLED display to display the readings of the buttons and joystick.
Overview
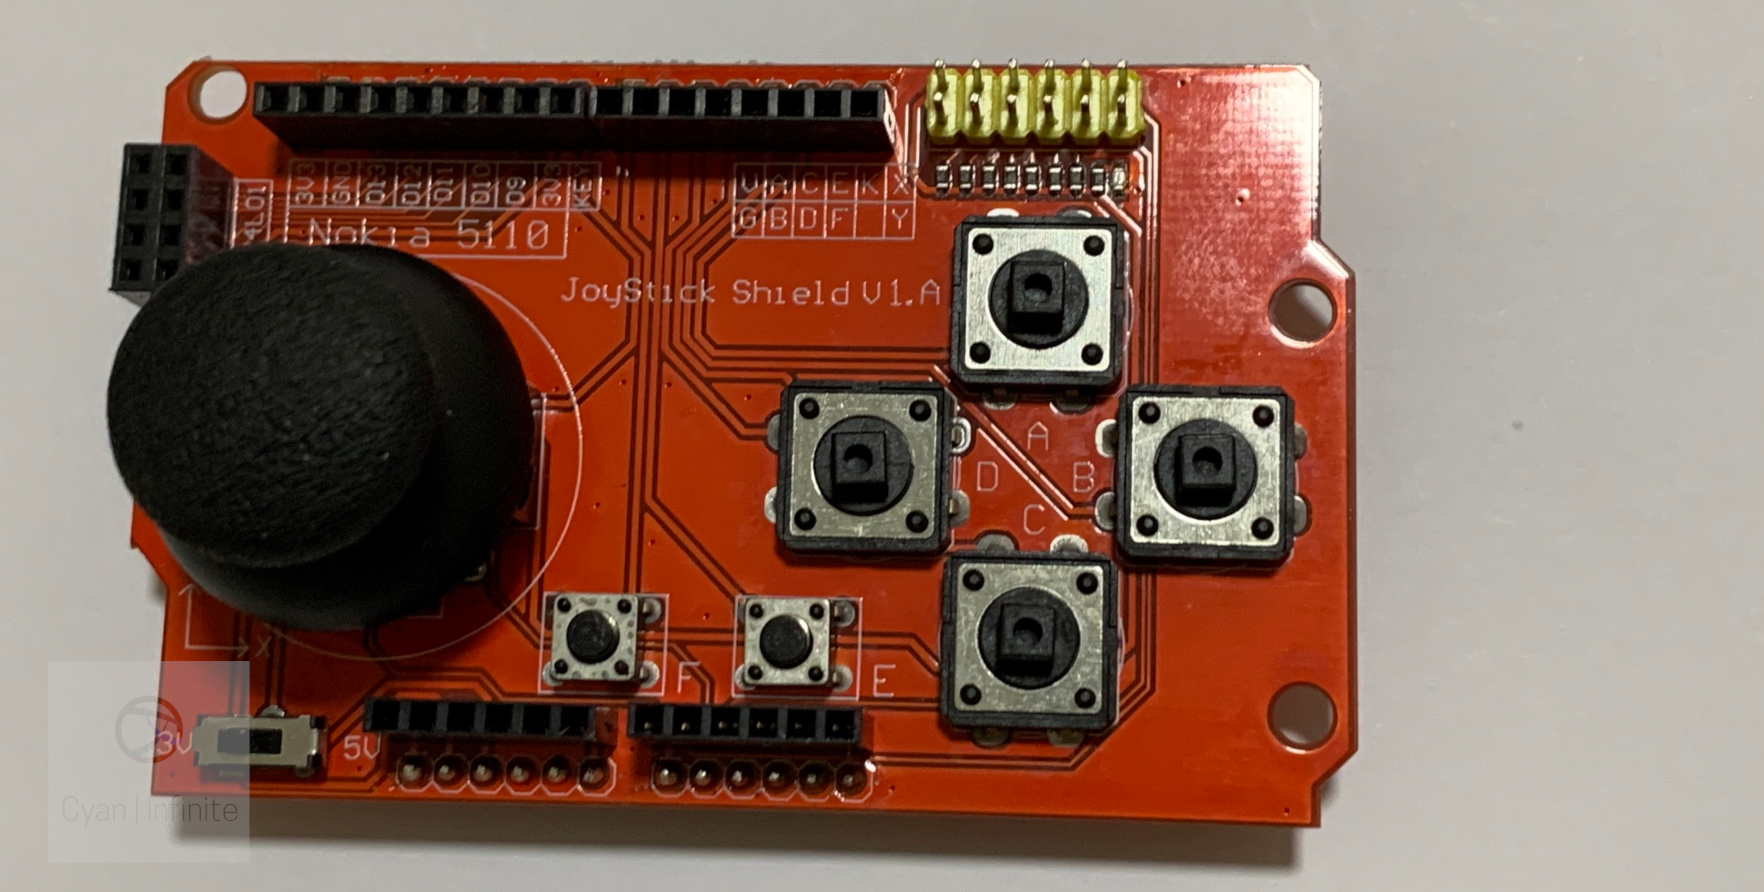
The Arduino Joystick Shield is a convinient shield that could be used to turn your Arduino Uno into a controller! Featuring a 2 axis joystick + 7 buttons, it could be used to easily control either a robot via a wireless module, or an interface to a game. A Nokia 5110 Display and a RF module could be attached to the Arduino Shield, but this may be covered in future post.
- 2 Axis joystick + 1 Push button (Can be pressed)
- 4 Momentary Button (Larger Push button)
- 2 Select Buttons (Smaller Push buttons)
Components
The components used are as follows:
- Arduino Uno
- Arduino Joystick Shield
- OLED 0.96″ Display, I2C
- Jumper Wires x 4
Schematics
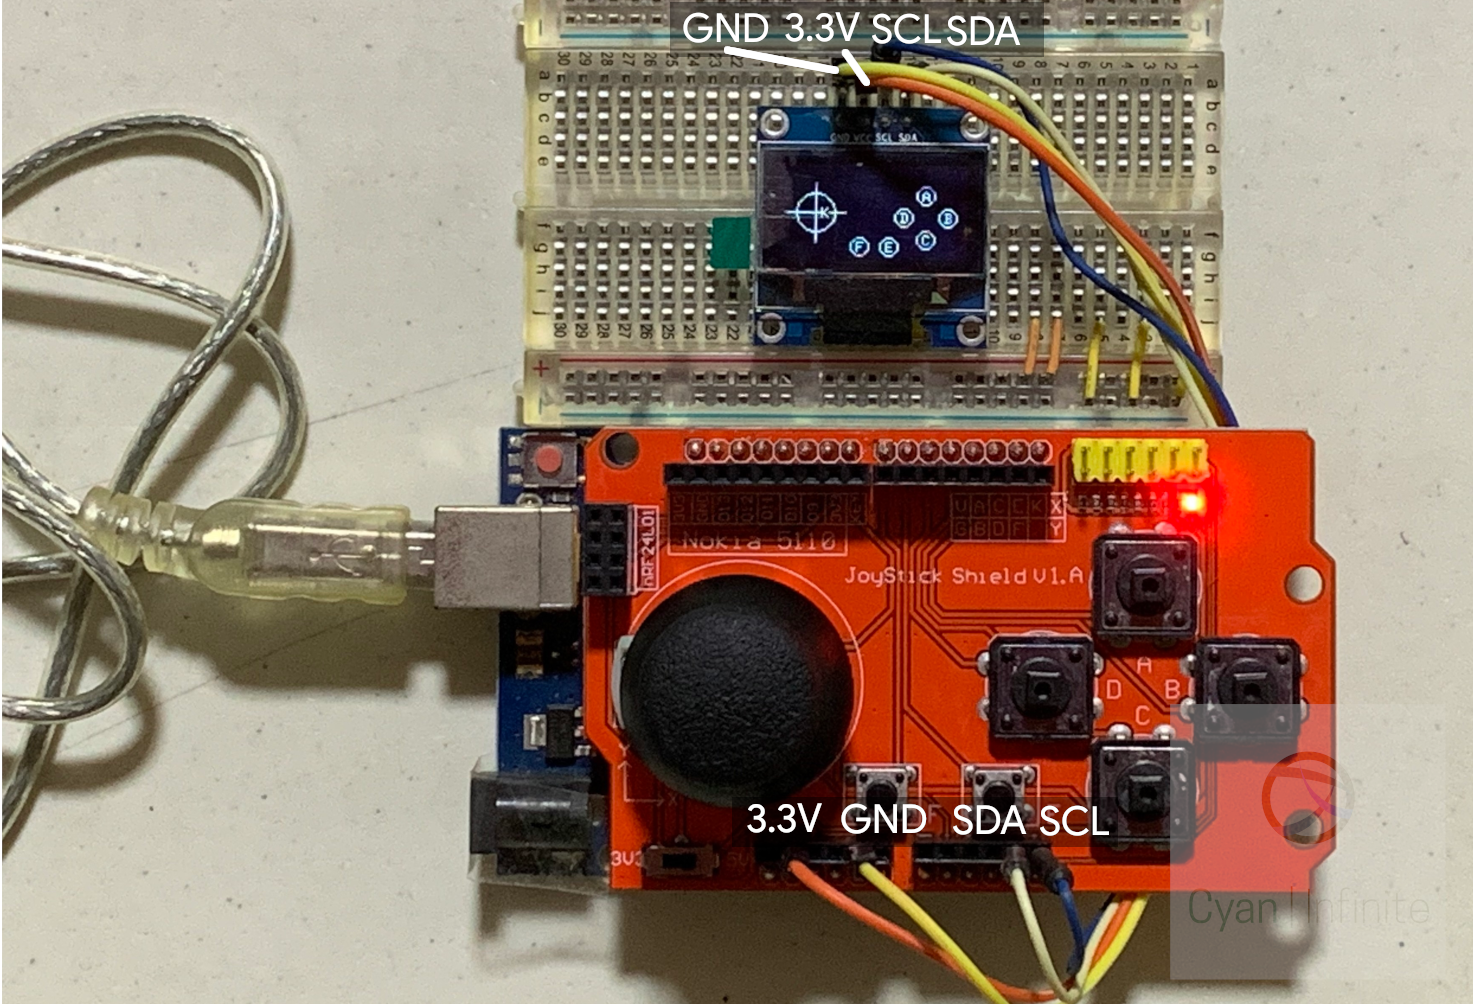
The shield could be easily attached onto the Arduino Uno, and the OLED Display is connected via 4 jumper wires.
Demo
Code
Pre-requisite
For the interfacing, we would be using the u8g2 library to display a User interface, in which the interface would respond according to the sensor readings read. The library could be downloaded here: https://github.com/olikraus/u8g2
Basic User Interface
The buttons are labelled, the circles would become larger when the buttons are pressed. The joystick location shown on the left side of the screen.
#include <Arduino.h>
#include <U8g2lib.h>

#ifdef U8X8_HAVE_HW_I2C
#include <Wire.h>
#endif

U8G2_SSD1306_128X64_NONAME_F_HW_I2C u8g2(U8G2_R0, /* reset=*/ U8X8_PIN_NONE);

const uint8_t PROGMEM a_btn{2};
const uint8_t PROGMEM c_btn{4};
const uint8_t PROGMEM d_btn{5};
const uint8_t PROGMEM b_btn{3};
const uint8_t PROGMEM e_btn{6};
const uint8_t PROGMEM f_btn{7};
const uint8_t PROGMEM k_btn{8};
const uint8_t PROGMEM x_joystick = A0;
const uint8_t PROGMEM y_joystick = A1;

// keep state of all btns
boolean prev_a_btn = false;
boolean prev_c_btn = false;
boolean prev_d_btn = false;
boolean prev_b_btn = false;
boolean prev_e_btn = false;
boolean prev_f_btn = false;
boolean prev_k_btn = false;

void setup() {
  // initialise the digital pins
  pinMode(a_btn, INPUT);
  pinMode(c_btn, INPUT);
  pinMode(d_btn, INPUT);
  pinMode(b_btn, INPUT);
  pinMode(e_btn, INPUT);
  pinMode(f_btn, INPUT);
  pinMode(k_btn, INPUT);

  //Setup display
  u8g2.begin();
  Serial.begin(9600);

  u8g2.setFont(u8g2_font_6x10_tf);

}

void btn_cb(bool new_val, bool &old_val)
{
  // if there is no change in state, don't generate events
  if (new_val == old_val)
    return;
  // update the previous value so changes in state can be registered
  old_val = new_val;
}

const int PROGMEM l_len{20};
const int PROGMEM cir_x{25};
const int PROGMEM cir_y{32};
const int PROGMEM cir_r{13};

const int PROGMEM txt_x{4};
const int PROGMEM txt_y{2};

void drawBtn(int x, int y, int r, int off_x, int off_y, int btn, char* txt) {
  u8g2.drawStr(x - r / 2 + off_x, y + cir_r / 2 - off_y, txt);
  u8g2.drawCircle(x, y, !digitalRead(btn) ? 3 * r / 4 : r / 2);
}

void loop()
{
  u8g2.clearBuffer();
  // handle normal buttons, the state will be true on LOW, when the
  // button is pressed (low resistance on button press)
  btn_cb(digitalRead(a_btn) == LOW, prev_a_btn);
  btn_cb(digitalRead(b_btn) == LOW, prev_b_btn);
  btn_cb(digitalRead(c_btn) == LOW, prev_c_btn);
  btn_cb(digitalRead(d_btn) == LOW, prev_d_btn);
  btn_cb(digitalRead(e_btn) == LOW, prev_e_btn);
  btn_cb(digitalRead(f_btn) == LOW, prev_f_btn);

  // to parse analog sensors to digital ones, we first read them and
  // map them to a value in [-1, 0, 1]
  int new_x_joystick = map(analogRead(x_joystick), 0, 1000, -1 * cir_r, cir_r);
  int new_y_joystick = map(analogRead(y_joystick), 0, 1000, -1 * cir_r, cir_r);
  Serial.print(cir_x + new_x_joystick);
  Serial.print("\t");
  Serial.print( cir_y + new_x_joystick);
  Serial.print("\n");

  //draw grid
  u8g2.drawLine(cir_x, cir_y - l_len, cir_x, cir_y + l_len);
  u8g2.drawLine(cir_x - l_len, cir_y , cir_x + l_len, cir_y);

  //draw circle
  u8g2.drawStr(cir_x + new_x_joystick, cir_y - new_y_joystick, "K");
  u8g2.drawCircle(cir_x + new_x_joystick, cir_y - new_y_joystick, !digitalRead(k_btn) ? 3 * cir_r / 2 : cir_r);

  //draw Btn
  //A
  drawBtn(100, 20, cir_r, txt_x, txt_y, a_btn, "A");
  //D
  drawBtn(85, 35, cir_r, txt_x, txt_y, d_btn, "D");
  //C
  drawBtn(100, 50, cir_r, txt_x, txt_y, c_btn, "C");
  //B
  drawBtn(115, 35, cir_r, txt_x, txt_y, b_btn, "B");
  //F
  drawBtn(55, 55, cir_r, txt_x, txt_y, f_btn, "F");
  //E
  drawBtn(75, 55, cir_r, txt_x, txt_y, e_btn, "E");

  u8g2.sendBuffer();

  //delay(5);
}