Contents
With the Air Conditioner IR Remote running out of battery in the middle of the night without spare batteries on hand, the Arduino Nano on my desk made me ponder: Why not create a simple remote with an IR sensor with some buttons and display?
Overview
This was a quick project that was developed in less than 20 minutes with the available components I had on hand, and the main objective of it is just to turn on the Air Conditioner as a was a relatively warm day. The idea of this project is to use an IR transmitter to communicate with the aircon, in which a button would act as a switch to "turn on" the AC. As I had saw similar IR communication based libraries that is available online to control fan, I suspected that there should be one for communicating with an AC.
Performing a quick search, there exist a few libraries in Github that utilises the Daikin AC protocol. I ultimately decide to select the Arduino_DY_IRDaikin library as it is more well documented compared to the other available libraries. Without a single IR transmitter at hand, I decided to use the IR compound eye as the transmitter: instead of receiving the reflectance of the IR transmitted by the sensor to determine the location of the object infront of the sensor, I would be using the sensor to only transmit the sensor to the AC unit.
Components
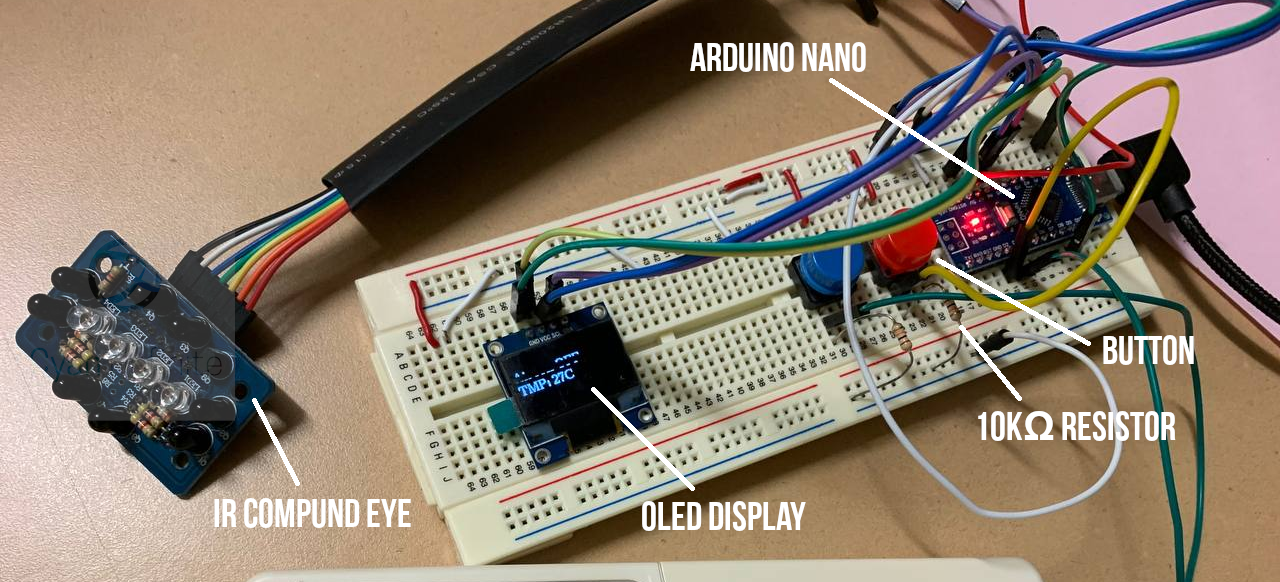
- Arduino Nano (Type C) x 1
- Breadboard x 1
- Jumper wires
- IR Compound Eye x 1
- Button x 1
- 10kΩ resistor x 1
Note: The blue button is not used.
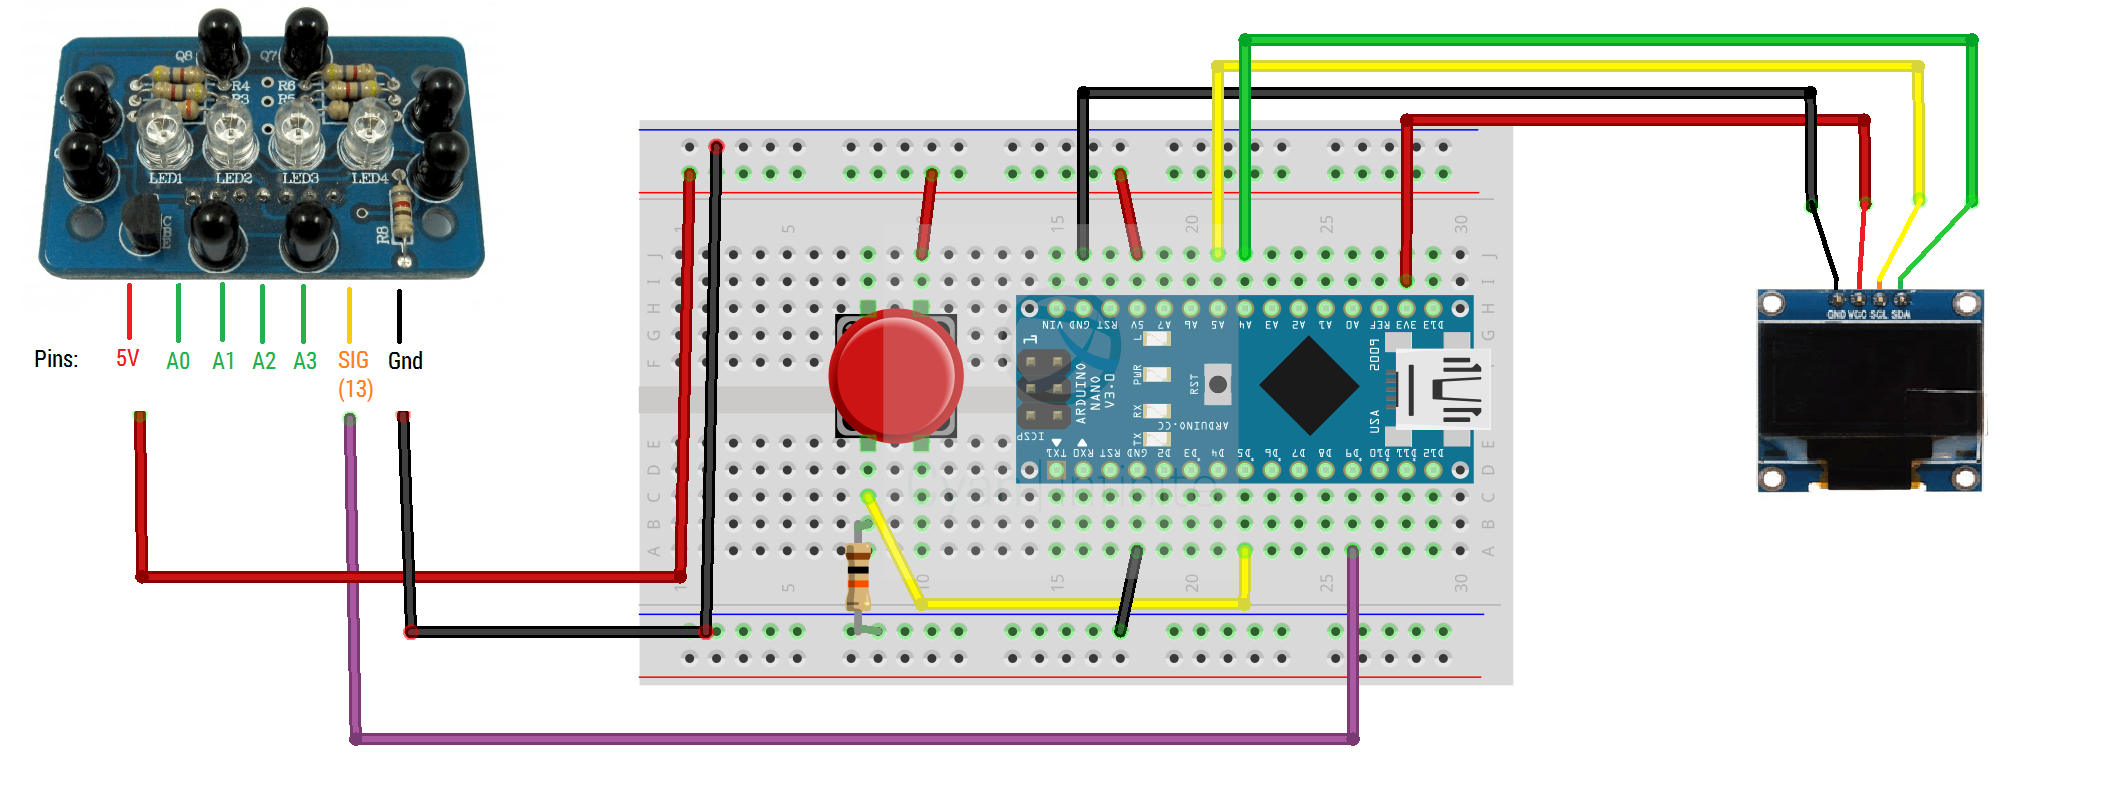
Schematics
Code
Library
Ensure that the Arduino_DY_IRDaikin library is installed before running the sketch.
Sketch
The sketch could be cloned at https://github.com/cyaninfinite/ac-remote-disp. Alternatively, the sketch is available below.
#include <Arduino.h>
#include <U8g2lib.h>
#include <Wire.h>     //For I2C
#include <DYIRDaikin.h>

DYIRDaikin irdaikin;
bool isOn {true};
bool prevState {false};
int currentTemp {27};

const byte btnOn = 5;     //Btn pin declaration

U8G2_SSD1306_128X64_NONAME_1_HW_I2C u8g2(U8G2_R0, /* reset=*/ U8X8_PIN_NONE);

void turnOn() {
  isOn = !isOn;
  sendCmd();
}

void sendCmd() {
  if (isOn) {
    irdaikin.on();
    irdaikin.setSwing_off();
    irdaikin.setMode(1);      // 0=FAN, 1=COOL, 2=DRY, 3=HEAT(if you have one)
    irdaikin.setFan(5);       // 0~4=speed(1,2,3,4,5),5=auto,6=moon
    irdaikin.setTemp(currentTemp);
  } else {
    irdaikin.off();
  }
  irdaikin.sendCommand();
}

void serialDebug() {
  while (Serial.available() > 0) {
    if (Serial.read() == 'p') {
      if (isOn == 0) {
        isOn = 1;
        irdaikin.off();
        Serial.println("Turn Off");
      } else {
        isOn = 0;
        irdaikin.on();
        Serial.println("Turn On");
      }
      irdaikin.sendCommand();
      Serial.println("Execute Command!");
    }
  }
}

void setup()
{
  Serial.begin(115200);

  pinMode(btnOn, INPUT);
  attachInterrupt(digitalPinToInterrupt(btnOn), turnOn, RISING);

  irdaikin.begin(9);           // Declare IR Pin

  irdaikin.on();
  irdaikin.setSwing_off();
  irdaikin.setMode(1);        //0=FAN, 1=COOL, 2=DRY, 3=HEAT(if you have one)
  irdaikin.setFan(5);         // 0~4=speed(1,2,3,4,5),5=auto,6=moon
  irdaikin.setTemp(currentTemp);

  irdaikin.sendCommand();
  isOn = 0;
  u8g2.begin();
}

void loop() {
  serialDebug();
  if (prevState != isOn) {
    u8g2.firstPage();
    do {
      u8g2.setFont(u8g2_font_ncenB10_tr);
      u8g2.drawStr(0, 24, isOn ? "Aircon ON" : "Aircon OFF");
    } while ( u8g2.nextPage() );
    prevState = isOn;
  }
}