Contents
In this project, I decided to explore using IR sensors to perform a simple motion tracking of a hand instead of using a camera as to simplify the tracking. The location of the hand will then be represented by a circle & displayed on a program written with Processing.
After searching through the Internet for IR sensors, I found that there was a sensor that has 4 IR sensors mounted on a single piece of PCB: and that was just what I needed! This sensor is known as “Infrared Compound Eye”.
How it works?
![]()
Let’s now take a look on how this IR eye will track an object. First, the arduino will turn on 4 of IR LEDs, which will be shone onto the object. The IR receivers will then measure the amount of (IR) light reflected back into the sensors from the object, which will be sent back to the arduino board. Using the Serial.print() function, the respective values of each sensor will be printed in the Serial window in the Arduino IDE.
In order to determine the location of the object, we will have to compare the values of the IR sensors respectively in sections, mainly the horizontal axis (x-axis) & the vertical axis (y-axis) to determine the object’s location. The left & right IR sensor would be part of the horizontal section, and the top & bottom IR sensor would be part of the vertical section.
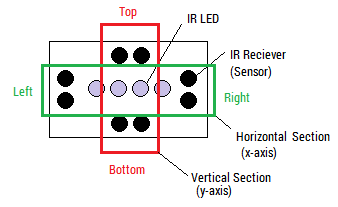
Taking the right & top as the positive, we will be able to obtain the X & Y location of the object by subtraction. To obtain the location in the X-axis, we will subtract the left IR value from the right, and for the y-axis, we will subtract the bottom IR values from the top. For this project, I did these calculations in processing instead of Arduino. The values of the respective sensors will then be read by Processing using the Serial monitor. [Please note that in order for Processing to read the Serial, the Arduino IDE Serial window have to be closed.] The respective values will then be mapped from its range (around 0 ~ 1000) to the range of 0 to either the height or the width of the program window. Calculations will then be done after mapping the values.
To visualise the location of the object, the Processing program will draw a ball to indicate the current location of the object, which will change according to where the object move, and the cross hair in the centre of the program to indicate the centre of the sensor. The program should look something like this:
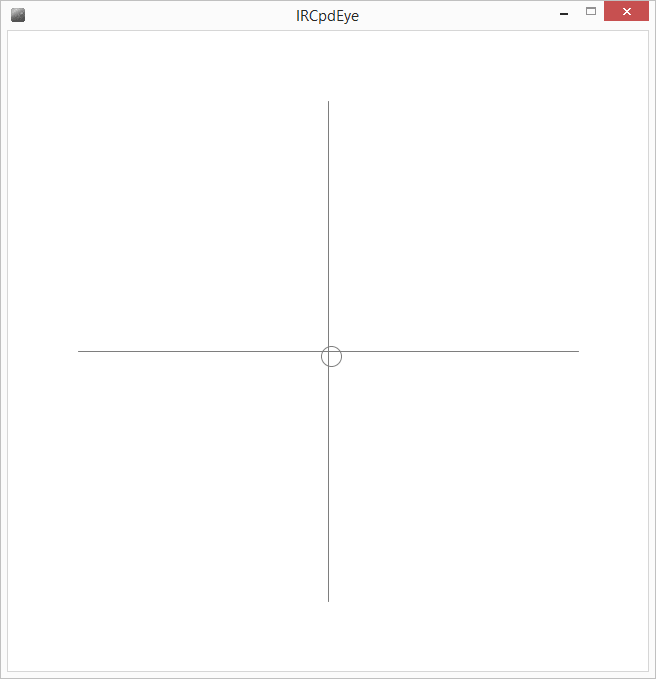
For this project, it will only detect object one at a time.
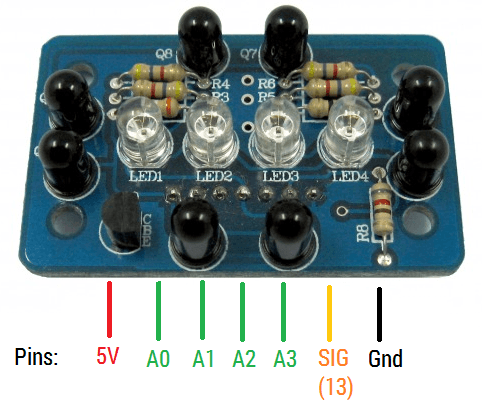
Pin Configuration
Parts used
- IR Compound Eye x 1
- Arduino Uno x 1
- Many Jumper wires
Schematics
[Coming Soon…]
Demo
Codes
Arduino
const int IRLeds = 13;
const int IRLeft = A0;
const int IRRight = A1;
const int IRUp = A2;
const int IRDown = A3;

int dist;
int leftVal;
int rightVal;
int upVal;
int downVal;

void setup(){
  pinMode(IRLeds,OUTPUT);
  Serial.begin(9600);
}

void loop(){
  readValues();
  delay(100);
}

void readValues(){
  digitalWrite(IRLeds,HIGH);
  leftVal=analogRead(IRLeft);
  rightVal=analogRead(IRRight);
  upVal=analogRead(IRUp);
  downVal=analogRead(IRDown);
  dist=(leftVal+rightVal+upVal+downVal)/4;

   Serial.print(leftVal);
   Serial.print(",");

   Serial.print(rightVal);
   Serial.print(",");

   Serial.print(upVal);
   Serial.print(",");

   Serial.print(downVal);

   Serial.print("n");
}
Processing
import processing.serial.*;     // import the Processing serial library
Serial myPort;                  // The serial port
int sWidth=640, sHeight=640;
float xHairLength = 200;
float xpos, ypos;           // Starting position of the ball

void setup() {
  size(sWidth, sHeight);

  // List all the available serial ports
  println(Serial.list());

  // Change the 0 to the appropriate number of the serial port
  // that your microcontroller is attached to.
  myPort = new Serial(this, Serial.list()[0], 9600);


  // draw with smooth edges:
  smooth();
}

void draw() {
  background(255);
  // Draw the shape
  ellipse((640/2)+xpos, (640/2)+ypos, 20, 20);
  //Draw crosshead
  stroke(0);
  line((sWidth/2)-250, sHeight/2, (sWidth/2)+250, sHeight/2);
  stroke(0);
  line(sWidth/2, (sHeight/2)-250, sWidth/2, (sHeight/2)+250);
}

// serialEvent  method is run automatically by the Processing applet
// whenever the buffer reaches the  byte value set in the bufferUntil()
// method in the setup():

void serialEvent(Serial myPort) {
  // read the serial buffer:
  String myString = myPort.readStringUntil('n');
  if(myString != null){
  // if you got any bytes other than the linefeed:
    myString = trim(myString);

    // split the string at the commas
    // and convert the sections into integers:
    int sensors[] = int(split(myString, ','));

    // print out the values you got:
    for (int sensorNum = 0; sensorNum < sensors.length; sensorNum++) {
      print("Sensor " + sensorNum + ": " + sensors[sensorNum] + "t");
    }
    // add a linefeed after all the sensor values are printed:
    println();
    if (sensors.length > 1) {
      float left,right,up,down;
      left = map(sensors[0], 0,1000,0,width);
      right = map(sensors[1], 0,1000,0,height);
      up = map(sensors[2], 0,1000,0,width);
      down = map(sensors[3], 0,1000,0,height);
      xpos=right-left;
      ypos=up-down;


    }
  }
  }